Custom Post Types Made Simple
Custom Post Types explanation for non-developers
If you are reading this article, you most likely already know that WordPress can be used as a Content Management System (CMS) rather than just a blogging system. There are quite a lot of articles for developers about turning WordPress into CMS with code examples and clever terms like taxonomy. But custom content can be made simple and you can turn WordPress into CMS without a single line of code. This article will show how.
There are three things you should master in order to create and show any custom content on your WordPress site:
- Custom post type – required
- Custom taxonomies- optional
- Custom fields -optional
To work with all these things you need to:
- Understand them
- Create them on your site
- Show them on your site
In this article we will talk about understanding, creating and showing the most important thing – custom post types.
When you work with blogs you are using the built-in post type – post. When you create a blog article, you are creating an entry in some table with the post type – post. When you create a page, you are creating an entry in the same table with the post type – page.
By default, WordPress has everything you need for working with the blogs and pages. But if you want to build for example an e-learning system, you most likely need to create entries with the post type – lessons to distinguish them somehow from the blogs and other content. This post would be called the custom post type as opposed to built-in post types like post and page. You can’t create lessons right after you install WordPress, so what are your options?
There are usually two ways you can add custom post type capability to WordPress.
Option 1. Buy a plugin that fits into your business needs. For e-learning system this most likely will be something like LearnDash. This plugin creates some custom post types and builds a few templates to show them. Actually you may never know that this plugin has created something called custom post types. That sounds cool but this kind of plugins exist for some general businesses only, like learning, events, polls etc. What if you are creating a unique business with no plugin out there.
Option 2. In this case you need to go one level deeper and create your custom post type yourself. For example If you want to create a TED like site with presentations you need to create a custom post type – presentation. There are plugins that can add new post types to your system without adding any business logic to them. The most popular plugin that does that is Custom Post Type UI. It is quite simple to use. You just need to enter post type name in the form, fill in some optional fields and you are done. If you called you post type presentation, you will see word presentation in you left admin menu close to Post and you will be able to create presentations the same way you create blog posts.
If you have chosen the option 2 and created a few presentations, you will need to do a bit more to show them on your WordPress site.
Showing your presentations.
Usually you want to show your presentations in three ways:
- Show the list of all your presentations
- Show the individual presentation
- Have a menu item in the menu for your presentations
Showing the list of your presentations
There is one term in the WordPress world called “slug” that you will often see. Slug is a kind of a system name for your custom post type. You configure slug when you create a new post type using a plugin like in option 2 above. In our case slug would most likely be a “presentation”.
To list all your presentations just go to www.your_site/slug or in our case www.your_site/presentation. For this to work you need to make sure your Permalink setting is set to post name. Read this article, if you want to know more about Permalinks.

Showing individual Presentations
To show the individual presentation just go to the link shown by a WordPress editor, similar to what you see when you edit the standard post. By default, you have the same settings like sidebars, etc that you have for blogs.
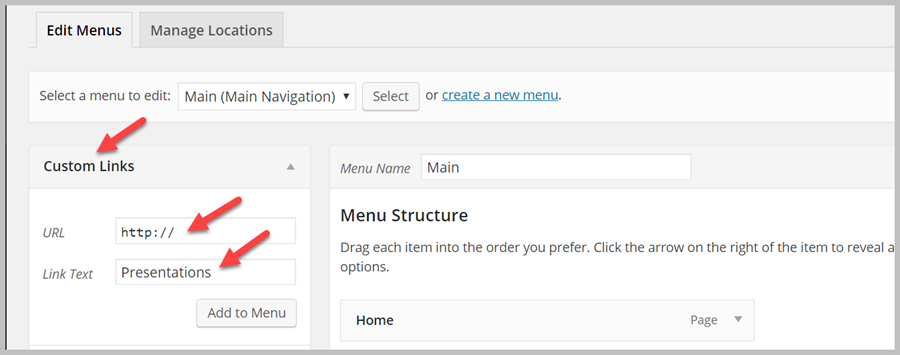
Configuring menu for presentations
To add a menu Presentation go to Appearance -> Menus, on the left sidebar choose Custom Link and add the same link as above i.e www.your_site/presentation
That all sounds quite easy. And yes, it is. The issue may be that you will get quite a basic site look. If you want to look professional, you need to use some WordPress theme that would add more configuration options to adjust your site layout, including the custom content layout.
You may spend days looking at hundreds of different themes. But if you are new to WordPress site building just peak up the most downloadable theme – Avada. It will do whatever you need unless you are building a very specific website. To add more custom content capabilities to Avada, check out our custom post type plugin.
Please keep in mind that no theme and plugin can possibly know what custom post types you may need. So if you want a specific design to your custom content, you will need to learn PHP or buy some advanced plugin like Toolset.
Next Steps. After you feel comfortable working with custom post types to your site without coding, read a more advanced article that has some coding examples. And after that check out the ultimate source of truth in the WordPress world – the Codex
In the next article we will make custom taxonomies and fields as simple as blog category and blog author name.